The practical guide – Part 1: Refactor android application to follow the MVP design pattern
The practical guide – Part 2: MVP -> MVVM
The practical guide – Part 3: Clean Architecture
Developing an application with clean architecture and design patterns is a path to success. But if we don’t know how to handle the dependencies that we created, this path is not going to be straightforward. It is important to understand what dependency injection is, and how to handle the dependencies properly, so we don’t end up with a mess. In the previous article, we created DependencyProvider object, where we provided the dependencies. Now, we will use the framework Hilt that will provide the dependencies for us. But let’s start with the basics:
Dependency Injection
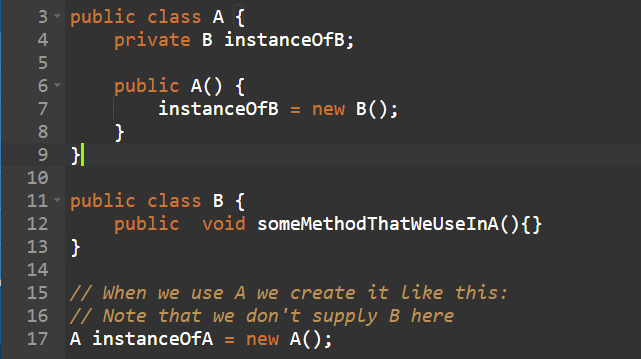
Before going into dependency injection, let’s define what is dependency alone? When Class A uses some methods of Class B, we say that A is dependent on B. So we have dependency A -> B. Now, imagine that A creates an instance of B, so whenever we create A, we don’t need to supply B, because A automatically creates B for itself.

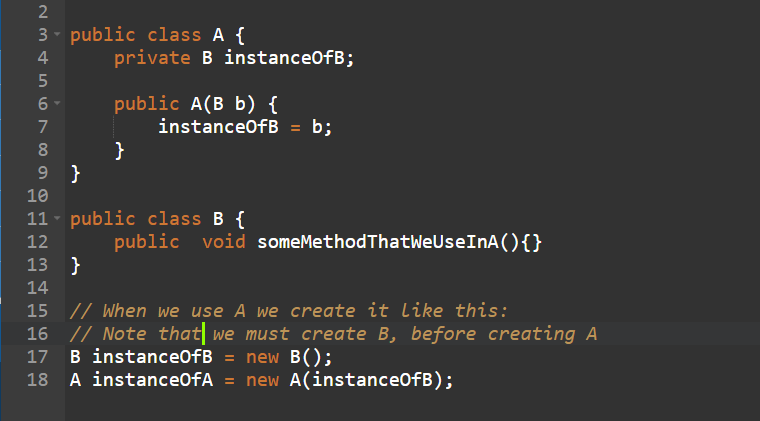
This is not good. Why? Mostly, because we cannot “inject” or provide other implementation of B. Why do we need other implementations of B? Well, the most common use case is for testing. If we want to test A, it will be very helpful for us to be able to provide mock or test implementation of B, instead of the real one. So, what is the fix? The fix is very obvious: instead of letting A create B, we pass B through the constructor/method/parameter of A. That means, whenever we want to create an instance of A, we must provide an instance of B first. So, we will have:

This little tweak that we just made, has a fancy name Inversion of control which is a general term of the other fancy term Dependency Injection. For the difference between these two terms, you can check this SO answer.
Too many dependencies
In the example above, A has only one dependency, and B doesn’t have any. What if B, has any dependencies, and that dependencies have their own dependencies and so on…? Then, when we want to create an instance of A, we will have to create all of those dependencies. And, if we use A in many places? You see where I am going, right?
How to fix this? One thing you can think of is by creating some class where you handle all the dependencies there (Like our DependencyProvider class). And, that is ok, you can do it by yourself. But, you can also use some framework that can help you.
Hilt
As you may suspect, Hilt is a library that helps us with handling the dependencies. It is a Google library, made specifically for Android. It is the most popular dependency injection library for Android development and is much easier to use than the more general Dagger 2 library.
Before going to the code, we have to check the architecture of the Hilt implementation, and the concept it uses. The three main concepts are:
- Module – a class in which we provide the dependencies. Here we create methods that return the actual implementation of the dependency.
- Component – an interface or an abstract class that connects dependencies from the Module and the class where we use those dependencies (In Dagger 2, we had to create these components, but Hilt creates most of them for us).
- Scope – annotation which connects the lifecycle of the objects that we provide in the module, and the component’s lifecycle. (Hilt also has the most common scopes created for us)
There are a lot of other things that we have to learn, but we will do it with the implementation.
Implementing Hilt
First, we have to add the library to our project. In the project’s root build.gradle file, we have to add hilt-android-gradle-plugin:
buildscript {
    // ...
    dependencies {
        // ...
        classpath 'com.google.dagger:hilt-android-gradle-plugin:2.38.1'
    }
}
Then, we have to apply the Gradle plugin and add the dependencies:
plugins {
  id 'kotlin-kapt'
  id 'dagger.hilt.android.plugin'
}

dependencies {
    implementation "com.google.dagger:hilt-android:2.38.1"
    kapt "com.google.dagger:hilt-compiler:2.38.1"
}
Next, we’ll annotate our application class with @HiltAndroidApp. If you don’t have an application class, create one (Don’t forget to add the class in the AndroidManifest file).
@HiltAndroidApp
class QuotesApp: Application() {
}
Once we annotate our application class, we can provide dependencies to other Android classes by annotating them with @AndroidEntryPoint. Hilt supports these Android classes: Application (by using @HiltAndroidApp), ViewModel (by using @HiltViewModel), Activity, Fragment, View, Service and BroadcastReceiver. So, in our case, we will annotate our ViewModel with @HiltViewModel and move the getQuotesUseCase property in the constructor:
@HiltViewModel
class MainViewModel @Inject constructor(private val getQuotesUseCase: GetQuotesUseCase) : ViewModel() {
…
}
Next, we will annotate our MainActivity with @AndroidEntryPoint and we will remove every usage of DependencyProvider.
@AndroidEntryPoint
public class MainActivity extends AppCompatActivity {
    ...
}
Now, we told Hilt, that it should provide us an instance of GetQuotesUseCase, but it doesn’t know how to. Because GetQuotesUseCase is our class, we can use constructor injection to tell Hilt how to create GetQuotesUseCase instances.
class GetQuotesUseCase @Inject constructor(private val quotesRepository: QuotesRepository) {
    ...
}
We can do this for every class that we want to inject: QuotesRepositoryImplementation, LocalDataSourceImplementation and RemoteDataSourceImplementation. This is cool, but we still haven’t told Hilt how to provide the interfaces (QuotesRepository, LocalDataSource, …).
Hilt modules
For interfaces or classes that we cannot constructor-inject (Classes from some outside library), we have to create a Hilt module, where we can tell Hilt how to provide instances for those classes. In our case, we will create a few modules: RepositoryModule, DataSourceModule, NetworkModule and DatabaseModule, where we will provide all of the dependencies that cannot be constructor-injected.
@Module
@InstallIn(SingletonComponent::class)
abstract class RepositoryModule{
}
We have to annotate the class with @Module and we have to tell in which component this module will be installed. Hilt has created some components that we can use. Every component defines the scope of the dependencies provided by the module. We installed QuotesModule in SingletonComponent, which means that the dependencies in this module will be Singleton (they will be created only once per application). Here are the other scopes that Hilt supports:
| Hilt component | Injector for |
| SingletonComponent | Application |
| ActivityRetainedComponent | N/A |
| ViewModelComponent | ViewModel |
| ActivityComponent | Activity |
| FragmentComponent | Fragment |
| ViewComponent | View |
| ViewWithFragmentComponent | View annotated with @WithFragmentBindings |
| ServiceComponent | Service |
There are two ways to inject dependencies in the module. With @Binds and with @Provides. When using @Binds, we tell Hilt which interface we want to return in the return type of the function, and as a parameter of the function we specify which implementation of the interface we want to provide.
@Module
@InstallIn(SingletonComponent::class)
abstract class RepositoryModule {
    @Binds
    abstract fun bindQuotesRepository(impl: QuotesRepositoryImplementation): QuotesRepository
}

@Module
@InstallIn(SingletonComponent::class)
abstract class DataSourceModule {
    @Binds
    abstract fun bindLocalDataSource(impl: LocalDataSourceImplementation): LocalDataSource

    @Binds
    abstract fun bindRemoteDataSource(impl: RemoteDataSourceImplementation): RemoteDataSource
}
The second way is with @Provides. A function annotated with @Provides supplies the following information for Hilt:
- The function return type tells Hilt what type the function provides instances of.
- The function parameters tell Hilt the dependencies of the corresponding type.
- The function body tells Hilt how to provide an instance of the corresponding type. Hilt executes the function body every time it needs to provide an instance of that type.
@Module
@InstallIn(SingletonComponent::class)
class DatabaseModule {
    @Provides
    @Singleton
    fun provideQuotesDao(quoteDatabase: QuoteDatabase): QuoteDao {
        return quoteDatabase.quoteDao()
    }

    @Provides
    @Singleton
    fun provideQuoteDatabase(@ApplicationContext context: Context): QuoteDatabase {
        return Room.databaseBuilder(
            context,
            QuoteDatabase::class.java,
            "quotes_db"
        ).build()
    }
}

@Module
@InstallIn(SingletonComponent::class)
class NetworkModule {
    @Provides
    fun provideQuotesApi(): QuotesApi {
        return RetrofitClient.getRetrofit().create(QuotesApi::class.java)
    }
}
In provideQuotesDao() we are asking for QuoteDatabase and with that, we can create our dao instance. Because we cannot construct-inject QuoteDatabase, we have to provide it too. For that, we need the application context. We can ask to get it as a parameter annotated with the Qualifier @ApplicationContext. Let’s see what qualifiers are:
Qualifiers
In some cases, we need multiple bindings for the same type. For instance, we might need two bindings for the retrofit client. One with authentication and another without. In order to implement it, we need to create two qualifiers:
@Qualifier
@Retention(AnnotationRetention.BINARY)
annotation class AuthenticatedRetrofitClient

@Qualifier
@Retention(AnnotationRetention.BINARY)
annotation class NotAuthenticatedRetrofitClient
And then, we will have to annotate the binding where we bind/provide it, and where we inject (use) it. We’ll have to change our NetworkModule:
@Module
@InstallIn(SingletonComponent::class)
class NetworkModule {
    @Provides
    @Singleton
    fun provideQuotesApi(@NotAuthenticatedRetrofitClient retrofit: Retrofit): QuotesApi {
        return retrofit.create(QuotesApi::class.java)
    }

    @Provides
    @Singleton
    @NotAuthenticatedRetrofitClient
    fun provideNotAuthenticatedRetrofitClient(): Retrofit {
        return Retrofit.Builder()
            .baseUrl("https://programming-quotes-api.herokuapp.com/")
            .addConverterFactory(GsonConverterFactory.create())
            .build()
    }
}
We don’t use authenticated retrofit clients in our case, but it is a nice example. There are some predefined qualifiers provided by Hilt, one example is the @ApplicationContext that we used, there is also @ActivityContext and you can find some more here.
One last thing that I want to mention is the Component Scopes. By default, all bindings in Hilt are unscoped. This means that each time your app requests the binding, Hilt creates a new instance of the needed type. Hilt allows us to scope a binding to a particular component. This means that the same instance of the binding will be used during the lifetime of the component. For every component that Hilt has predefined, it also has a scope for it. For instance, SingletonComponent has @Singleton scope, ActivityComponent has @ActivityScoped etc…
For our application, that’s it. We can get rid of the DependencyProvider file and we have successfully implemented Dagger Hilt. You can check out the code here.


