The practical guide – Part 1: Refactor android application to follow the MVP design pattern
This is the second part of the practical guide. In the first part, we talked about refactoring android application to MVP. Now, instead of refactoring the base code to MVVM, I would like to refactor the MVP application to MVVM. That way we will learn the differences between MVP and MVVM.
Why MVVM?
First, I should tell you that Google accepted MVVM as preferred design pattern for building Android applications. So, they have build tools that helps us following this pattern. This is a great reason to learn and use this pattern, but why would Google choose MVVM over MVP (or other design patterns). Well, they know best but, my opinion is that they chose MVVM because it has one less dependency, due to the difference in communication between ViewModel and View. I will explain this in the next section.
Difference between MVP and MVVM
As we know, MVP stands for Model-View-Presenter. On the other hand, MVVM stands for Model-View-ViewModel. So, the Model and the View in MVVM are the same as in the MVP pattern. The only difference remains between the Presenter and View Model. More precisely, the difference is in the communication between the View and the ViewModel/Presenter.
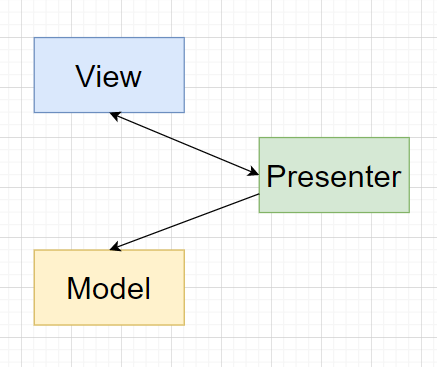
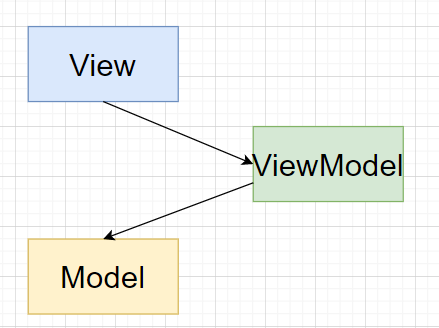
As you can see in the diagrams, the only difference is the arrow from Presenter to View. What does it mean? It means that in MVP you have an instance of the Presenter in the View, and you have an instance of the View in the Presenter, hence double arrow in the Diagram. In MVVM you only have an instance of the ViewModel in the View. But, how do you communicate with the View? How can the View know when the ViewModel has made changes in the Model? For that, we need the Observer pattern. We have observables(subjects) in the ViewModel, and the View subscribes to this observables. So, when the observable is changed, then the View is automatically informed about that change, and it can update its views.
For practical implementation of this Observer pattern, we have to get help either from some external libraries like RxJava, or we can use the new architecture components from Android. We will use this later in this example.
Refactoring
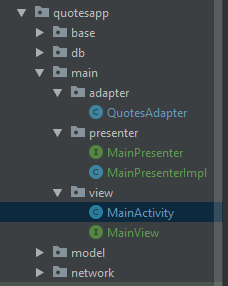
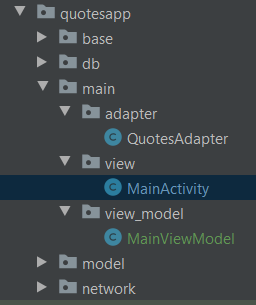
First, we can get rid of the MainPresenter and MainView interfaces. We can have only one new class MainViewModel, that replaces the Presenter. Then we can extend MainViewModel from androidx.lifecycle.ViewModel. This is the first class that we will use from the android lifecycle components. This class helps us to deal with the lifecycle of the view model. It survives configuration changes, so it is a nice place for storing UI related data. Next, we will add quoteDao and quotesApi fields. We will initialize them with setters, instead of the constructor, because the creation of the ViewModel is a little bit different. We don’t have the MainView, and also we don’t need bindView() and dropView() methods.
Next, we will create the observable objects. These are objects that we want to display in the MainActivity, wrapped with androidx.lifecycle.LiveData or some other implementation of LiveData. This class helps us with the implementation of the observer pattern. We will create the objects in the MainViewModel, and we will observe these objects in the MainActivity. We want to display a list of Quote objects, so we will create MutableLiveData<List<Quote>> object. MutableLiveData because we want to change the value of the object manually.
getAllQuotes() will be very similar as in the Presenter, except minus the interaction with the MainView. So, instead of:
if (view != null) {
  view.displayQuotes(response.body());
}
we will have:
quotesLiveData.setValue(response.body());
We will also change the implementation of the DatabaseQuotesAsyncTask, so instead of sending the MainView, we will create a new interface that will get us the quotes from the async task and we will send the implementation of this interface there. In the implementation, we will update quotesLiveData, same as above.
In the MainActivity, we remove the implementation of the MainView. We won’t need to override onDestroy() method. We can replace the MainPresenter with the MainViewModel. We will create the ViewModel as follows:
viewModel = new ViewModelProvider(this, new ViewModelProvider.NewInstanceFactory()).get(MainViewModel.class);
viewModel.setQuoteDao(quoteDao);
viewModel.setQuotesApi(quotesApi);
Then we will observe to the quotesLiveData observable, and display the list.
viewModel.quotesLiveData.observe(this, quotes -> {
    QuotesAdapter adapter = new QuotesAdapter(quotes);
    rvQuotes.setAdapter(adapter);
});
And in the end, we call viewModel.getAllQuotes() to fetch the quotes.
And that’s it! Now we have an application that follows the MVVM design pattern. You can check the full code here.

