Introduction
If you’ve been keeping up with the latest developments in the AI landscape, you’ve likely come across DeepSeek. Rather than revisiting the basics, this guide will dive straight into integrating DeepSeek’s R1 reasoning model into your Java and Spring Boot applications.
This tutorial will walk you through the complete setup, covering both REST API integration and real-time streaming responses—perfect for developers eager to build robust, AI-powered applications.
Why Use Spring AI?
As we start to build out more intelligent applications building generative AI applications, we will really want to bring in a framework like Spring AI because it gives us a lot of advantages. One of those advantages is a unified API across AI providers. So there may be a situation where we want to use two different AI providers, for example Google Gemini and DeepSeek or OpenAI and Claude. With Spring AI, we can go ahead and write the same code, the same abstraction and talk to these multiple AI providers.
We also get structured output handling, observation of monitoring, the ability to call functions and tools, built-in Retrieval Augmented Generation (RAG) support, and all of the things that you’ll need when you start building out some of these real-world applications.
Writing the Application Code
We’ll jump over to Spring and build a Spring Boot application that talks to the REST API.
What are we waiting for? Let’s write some code.
Creating the Spring Boot Application
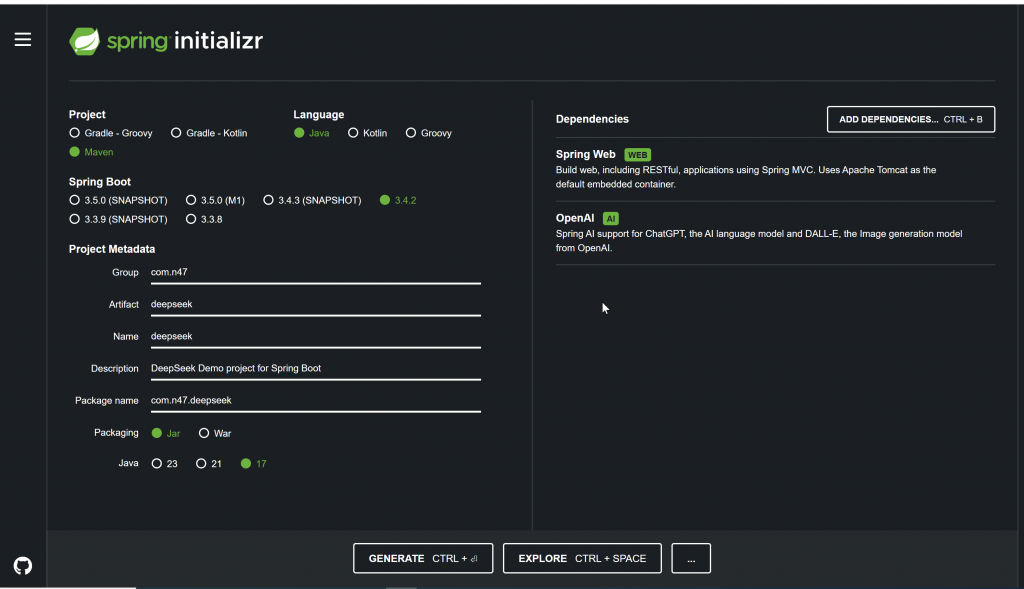
Let’s create a Spring Boot application from start.spring.io with Maven, Spring Boot 3.4.2, Java 23, and the required dependency for DeepSeek as shown in the below screenshot:
Open the downloaded project into your favorite IDE and configure application.properties as mentioned below:
# OpenAI
spring.ai.openai.api-key=${DEEPSEEK_API_KEY}
spring.ai.openai.base-url=https://api.deepseek.com
spring.ai.openai.chat.options.model=deepseek-reasoner #R1 reasoning model
Set up your environment variables:
export DEEPSEEK_API_KEY=your_api_key_here
Creating DeepSeekController
Create DeepSeekController, which includes several endpoints for interacting with AI models. Also, define chatClient with @Qualifier("openAiChatClient") in case you want to use multiple chat clients for the same application. We have created two endpoints: The first endpoint waits to get a full response from DeepSeek and then returns a response to the consumer of the endpoint. The second endpoint returns a response to the consumer of the endpoint immediately (getting a partial response from DeepSeek).
package com.n47.deepseek;

import org.springframework.ai.chat.client.ChatClient;
import org.springframework.ai.chat.model.ChatResponse;
import org.springframework.beans.factory.annotation.Qualifier;
import org.springframework.web.bind.annotation.GetMapping;
import org.springframework.web.bind.annotation.RequestParam;
import org.springframework.web.bind.annotation.RestController;
import reactor.core.publisher.Flux;

@RestController
public class DeepSeekController {

    private final ChatClient chatClient;

    public DeepSeekController(@Qualifier("openAiChatClient") ChatClient chatClient) {
        this.chatClient = chatClient;
    }

    @GetMapping("/deepseek/generate")
    public ChatResponse generate(@RequestParam String message) {
        return chatClient.prompt().user(message).call().chatResponse();
    }

    @GetMapping("/deepseek/generate-stream")
    public Flux<ChatResponse> generateStream(@RequestParam String message) {
        return chatClient.prompt().user(message).stream().chatResponse();
    }
}
Defining OpenAiChatClient Configuration
Define OpenAiChatClient configuration. If you want to use multiple Generative AI in the same application, then you can also define multiple configurations for Chat Client.
package com.n47.deepseek;

import org.springframework.ai.chat.client.ChatClient;
import org.springframework.ai.openai.OpenAiChatModel;
import org.springframework.context.annotation.Bean;
import org.springframework.context.annotation.Configuration;

@Configuration
public class DeepSeekConfig {

    @Bean
    public ChatClient openAiChatClient(OpenAiChatModel chatModel){
        return ChatClient.create(chatModel);
    }
}
Running and Testing the Application
The application is now ready to run. Test the endpoints using curl or your preferred HTTP client:
# Basic DeepSeek request
curl http://localhost:8080/deepseek/generate?message=Tell me a joke

# Streaming DeepSeek response
curl http://localhost:8080/deepseek/generate-stream?message=Tell me a joke
Final Thoughts
And there you have it—your first Spring Boot application powered by DeepSeek’s R1 reasoning model is up and running! From basic AI-powered responses to real-time streaming outputs, you now have a solid foundation to explore even more capabilities.
Next steps? You can expand your application by integrating other AI models like Google Gemini, OpenAI, or Claude using Spring AI’s unified API.
Happy coding!